Configuring LVS & Piranha on CentOS for Direct Routing
This post describes how to configure CentOS for load balancing via LVS (http://www.linuxvirtualserver.org/) and Piranha (https://www.redhat.com/software/rha/cluster/piranha/). It is by no means a debugging guide, but explains the basics.
The Scenario
In my scenario, I'm going to configure a 3-node load balanced cluster, protected with a backup router in-case of active load balancer failure. There are a number of routing types available, but I'm going to use the Direct Routing method (https://access.redhat.com/site/documentation/en-US/Red_Hat_Enterprise_Linux/5/html/Virtual_Server_Administration/s2-lvs-directrouting-VSA.html).
The following diagram (stolen from the RedHat site) depicts the solution well.
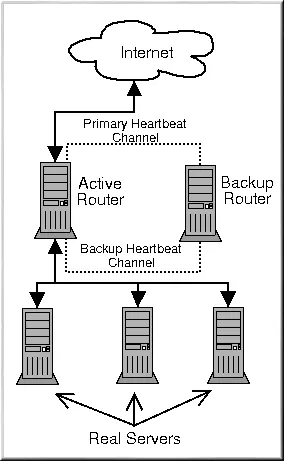
From the bottom-up:
- Real servers running Nginx, answering on 172.16.224.3:80, 172.16.224.4:80 & 172.16.224.5:80, all as eth0. These have been pre-configured;
- Active router configured with eth0 as 172.16.224.6;
- Backup router configured with eth0 as 172.16.224.7. In our example, we will be assigning 172.16.224.10 as the virtual IP (VIP) - the address that we are going to make available through the load balancer.
Deployment Steps
From a base CentOS 6 install, we're going to install IPVSADM (the administration system for IPVS - http://www.linuxvirtualserver.org/software/ipvs.html) and Piranha with default settings. We will also install Pulse (http://linux.die.net/man/8/pulse), which will give us the heartbeat monitoring between active and backup nodes. Once installed, we want to ensure that Pulse, the Piranha GUI and Apache (which Piranha runs under) all auto-start.
yum -y install ipvsadm piranha
chkconfig pulse on
chkconfig piranha-gui on
chkconfig httpd on
Now that we have installed the required services, we need to configure a few things. First set the password that we will use to access the Piranha GUI.
piranha-passwd
The IPVS portion of the LVS acts as a router for packets received upon the VIP. We need to ensure that these are forwarded on to the real servers. To do this, we need to make a change to the sysctl configuration, as follows.
/sbin/sysctl -w net.ipv4.ip_forward=1
Ideally we want to ensure that this is a permanent change, so you may need to edit /etc/sysctl.conf and ensure that the following applies (may require a reboot prior to taking effect).
net.ipv4.ip_forward = 1
Now start both the Apache HTTPd and Piranha GUI.
service httpd start
service piranha-gui start
The Piranha GUI will now be available upon port 3636 (default) of the active router, in my case http://172.16.224.6:3636. Username is 'piranha' and the password will be whatever you set earlier.
Now repeat these steps exactly, upon the backup router (or if you're using virtualisation, time to template and re-deploy).
Configuring the Router
Next we need to configure the router to include the real servers upon the VIP. You can do this through the Piranha GUI if you wish (it is very straight forward), but essentially all that this does is to create the configuration file for LVS (/etc/sysconfig/ha/lvs.cf).
The configuration file below has been built using the GUI. It shows that there are 3 real server nodes (addressed as per the information above). All three servers are load balanced upon a round robin basis, with exactly the same weighting (no preference). A health check is made from the routers to each of the real servers, expecting an HTTP response from a call to / on each server.
serial_no = 25
primary = 172.16.224.6
service = lvs
backup_active = 1
backup = 172.16.224.7
heartbeat = 1
heartbeat_port = 539
keepalive = 5
deadtime = 10
network = direct
debug_level = NONE
monitor_links = 0
syncdaemon = 0
virtual lvsdev-vip {
 active = 1
 address = 172.16.224.10 eth0:1
 vip_nmask = 255.255.255.0
 port = 80
 send = "GET / HTTP/1.0rnrn"
 expect = "HTTP"
 use_regex = 0
 load_monitor = none
 scheduler = rr
 protocol = tcp
 timeout = 6
 reentry = 15
 quiesce_server = 0
 server nginxdev1 {
  address = 172.16.224.3
  active = 1
  port = 80
  weight = 1
 }
 server nginxdev2 {
  address = 172.16.224.4
  active = 1
  port = 80
  weight = 1
 }
 server nginxdev3 {
  address = 172.16.224.5
  active = 1
  port = 80
  weight = 1
 }
}
The exact same configuration must be deployed to both active and backup routers, and the Pulse service restarted prior to configuration changes taking effect. A simple way to do this is to SCP the configuration file from one router to the other.
scp /etc/sysconfig/ha/lvs.cf root@172.16.224.7:/etc/sysconfig/ha/lvs.cf
You'll notice that after service restart that the VIP is brought-up on eth0:1, seen by running ifconfig. If the active router is taken offline, the backup router automatically assumes control and brings-up the VIP on eth0:1.
Configuring the Real Servers
Direct routing through LVS requires that the VIP is configured on both the routers and also the real servers. Obviously we don't want to do this upon a broadcast network, as we would receive IP conflicts, so we typically configure this as a second interface upon the loopback adapter.
ifconfig lo:0 172.16.224.10 netmask 255.255.255.255
You'll note that lo:0 is now configured to respond to the VIP, see by running ifconfig. Obviously this is not a permanent allocation, you in CentOS, you'll want to create a configuration file for this interface (/etc/sysconfig/network-scripts/ifcfg-lo:1). See my networking post for more information.
The final step is to ensure that the newly configured adapter doesn't respond to ARP requests. There is a decent guide available on Austintek.com, but essentially the following must be added to the end of /etc/sysctl.conf.
# ipvs settings for realservers:
net.ipv4.conf.lo.arp_ignore = 1
net.ipv4.conf.lo.arp_announce = 2
Monitoring
In order to see what is happening in real-time, we can use the watch command. This will show the real servers that are responding to the VIP, and also the number of active and inactive connections.
watch ipvsadm
A good way to test what's happening, and how LVS handles the traffic is to use Siege to throw a number of concurrent connections at the VIP.